API Reference
Discoverability via TypeScript types is a design goal for useAuth. Nevertheless, this page aims to describe all user-facing APIs and how you might use them.
The API for useAuth comes in 3 parts:
<AuthConfig />to configure authuseAuth()to interact with the auth systemdispatch()for direct access to the underlying XState machine
AuthConfig
<AuthConfig /> is a component that helps you configure useAuth. You don't need to use AuthConfig but it makes life easier.
<AuthConfig /> accepts 3 props:
authProvider, an auth provider class conforming to the auth providers specnavigate, a routing function for your environmentparams, optional params object to configure your auth provider. Each auth provider defines its own API for paramschildren, optional React children if you prefer wrapping. But AuthConfig is not a context provider.
The component ensures your auth provider is initialized and sessions are checked on render. You can do this yourself with the dispatch() API.
useAuth()
The useAuth() hook is the main API you use to interact with this library.
const Component = () => {const { ... } = useAuth()// do stuffreturn <RenderStuff />}
The hook exposes these values:
isAuthenticating, boolean whether we're currently authenticating. Great for loading spinnersisAuthenticated(), method to check if user is currently authenticatedisAuthorized(), method to check if user has the right roles or scopesuser, object with user properties; differs between providersuserId, string identifying the current userauthResult, object with the latest authentication resultlogin(), function to trigger login processsignup(), function to trigger signup processlogout(), function to trigger logout processhandleAuthentication(), function to use in auth callback pagesdispatch(), function to access the underlying XState machinery
If your editor supports TypeScript and JSDoc hinting, you should see a list of these APIs every time you use useAuth.
dispatch()
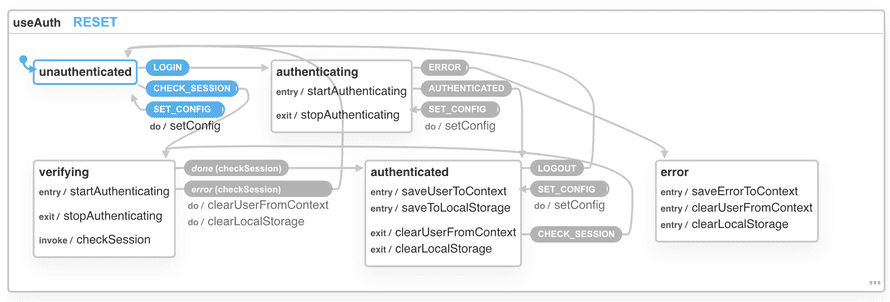
useAuth uses XState to manage state.
You can use the exposed dispatch() method to trigger actions manually. <AuthConfig> uses this to handle configuration.
Run this code in any React component to get access:
const { dispatch } = useAuth();// dispatch('ACTION')// dispatch('ACTION', { payload })
You can then fire any of these actions:
LOGINstarts the login processCHECK_SESSIONverifies the current user sessionSET_CONFIGconfigures useAuthERRORmoves the machine into an error end-stateAUTHENTICATEDsets user dataLOGOUTclears user data
Using dispatch() manually is discouraged. The most common use-case is for configuring useAuth without the <AuthConfig> component.
// how AuthConfig uses dispatch()export const AuthConfig = ({authProvider,params,navigate,children}) => {const { dispatch } = useAuth();const callbackDomain =typeof window !== "undefined"? `${window.location.protocol}//${window.location.host}`: "http://localhost:8000";React.useEffect(() => {// instantiate auth provider on page loadconst authInstance = new authProvider({dispatch,...authProvider.addDefaultParams(params as ProviderOptions,callbackDomain)});// set config in XStatedispatch("SET_CONFIG", {authProvider: authInstance,navigate,callbackDomain});dispatch("CHECK_SESSION");}, [dispatch, authProvider, params, navigate]);return <>{children}</>;};
